
 |
| Gift Box Closed |
 |
| Explosion Box Opened with Gift Card |
 |
| Gift Card Up Close |
WOW! What a FUN way to give a gift card! Explosion Boxes are such a surprise to the receiver to open! Many are used for scrapbooks and highlighting photos of momentous trips, family & friends, pets, anything that is captured in picures. This box will be going to a baby shower. A few years ago, when my husband & I celebrated our 30th Anniversary on a Cruise, I made him an Explosion Box full of gift cards to some of his favorites: restaurants, a department store, a sporting good store, and OUR favorite place to spend time-Walt Disney World! It travelled so well, because I kept it flat and hidden until our Anniversary!
Do you recognize the paper, ribbon & brads?? I didn't think so! It will be one of the FREE items in the Sale-A-Bration (SAB) Catalog which will be available January 24 ! For EVERY $50 you spend in Stampin' UP! product, you get to choose a free item from the SAB Catalog! If you need a SAB Catalog, contact me.
Check out the other Explosion Boxes Challenge at Butternut Sage Designs! Be sure and let the Designer's know if you like their Boxes!
Have a La Dee Dah Day!
Stamp Sets: Occasions Alphabet and Short & Sweet
Ink: Pool Party, Poppy Parade
Card Stock: Pool Party, Poppy Parade, Very Vanilla
DSP- Everyday Enchantment (free during SAB with Product Purchase)
And More: Jewels- Pearls, Brads & Ribbon-SAB Bundle (free during SAB with Product Purchase)


And More: Jewels- Pearls, Brads & Ribbon-SAB Bundle (free during SAB with Product Purchase)
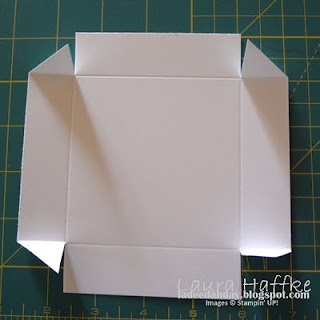
Picture Tutorial- Explosion Box

Base: Cut 8 1/2" x 8 1/2" Card Stock
Score 2 1/2" on all 4 sides

Remove ALL 4 Corners

Fold and Burnish with a Bone Folder ALL 4 Sides

LID

Lid: Cut 5 5/8" x 5 5/8" Card Stock
Score 1" on ALL 4 Sides

Snip Corners at an Angle from Score Line to Score Line

Cut along Score Line as Shown

Fold and Burnish the Creases with your Bone Folder

Add Sticky Strip to Angled Cut Corners as Shown

Remove Sticky Strip's top Layer and Match Edges of Lid and Adhere.

Fold up ALL 4 Sides of Base and Place Lid on Top

TO DECORATE THE BOX IN LAYERS:
I measure each side, then cut the layer 1/8" shorter than the measurements.
EX: If it measures 3 1/2" x 3 1/2 " I cut the next Card Stock layer 3 3/8" x 3 3/8" and glue it down. The layer on top of that will be 1/8" shorter than the last piece. The Designer Series Paper (DSP) will measure 3 1/4" x 3 1/4", and glue it down.
The Bow is about 18 pieces of 2 1/2" x 1/2" Strips. They are curved with the bone folder and a hole punched using the Crop-a-Dile and then fastened with a Designer Brad.

4 comments:
wow look at ALO the sweet elements you incorporated into your Explosion box! LOVE the idea....so "unexpectedly" Pretty!
Wow, Laura. It's beautiful. I love all the different parts to it. The recipient is going to love not only the gift card but the entire package!
This is super cute Laura! Great color choices.
Lovely box with some nice items inside
Post a Comment