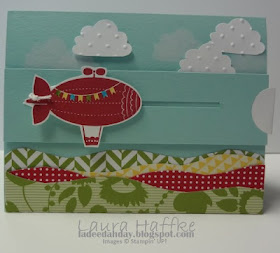
I am so happy to show you another card featuring the Moving Forward Stamp Set. I had a request to share how I made the slider card. I was wanting to make a video... but with my cold this week, I am not in the recording mode. SOOOOO, I snapped a few pictures and will walk you through the process.... sniff, sniff....
Here is the prep & ingredients:
Stamp Sets:
Moving Forward
Pennant Parade
Card Stock:
Pool Party- 5 1/2" x 8 1/2" score @ 4 1/4"
2" x 5 1/2" - Slider Track
3/4" x 5"- Pull Strip
2 @ 1 1/2" x 1/8"-Pull Guides
Whisper White-
3 Clouds- 4 1/4" x 5 1/2" ran through the Big Shot using Polka Dot Embossing Folder and punched clouds using Cupcake Punch
1" circle punch- Pull Strip Tab
Pennant Punch- 2" x 2"
Blimp- 3" x 3"
Summer Smooches Designer Series Paper 4 patterns- 1 1/2" x 5 1/2"
Ink:
Cherry Cobbler- Blimp
Whisper White- clouds using sponge dauber
Markers:
Tempting Turquoise
Daffodil Delight
Old Olive
Misc:
White Baker's Twine
Sponge Daubers
Adhesives
2" x 5 1/2" - Place on 3/4" , close cutting flap.
Cut starting at the 1" to the 4 1/2".
Move paper 1/8" over and cut again from
the 1" to the 4 1/2"
Snip both ends, exposing the track opening.
Trim 1/2" off long side, centering the track opening.
( the end result is to have a piece 1 1/2" x 5 1/2",
I cut it larger to manipulate on my trimmer easier)
Punch out a notch using your 1" Circle Punch
Punch 1" Circle out of Whisper White, fold it in 1/2
Glue it on to the end of the 3/4" x 5" Pool Party pull strip.
Add Stampin' Dimensional strips cut from the edges of
the Stampin' Dimensionals. They should border 3 sides
of the Pull Strip.
Turn over and mark where the front 1/3 of the Blimp
will be to add the Pull Guides.
Using Pull Strip only, fold your Pull Guides in 1/2.
Glue on Pull Strip as shown. Trim edges to same
width as Pull Strip.
Put the Pull Guides through the Track.
Lightly add glue to Pull Guides.
Adhere Blimp to Guides and pull the slide for easy Glide.

Ink Pennant Parade and "Hello" using Markers and
punch out using Pennant Builder Punch.
Punch a hole in the tail of the Blimp and the Pennant.
Arrange under the Blimp to hide when not extended.
Adhere Pennant down.
Tie the Twine on the punched holes in the Pennant
and Blimp Tail.
Card Base is completed by folding in 1/2, adding
some clouds with the sponge dauber. Making rolling
hills with Summer Smooches DSP and placing on
2 punched clouds.
Remove adhesive backing from Stampin' Dimensionals
Stick to card base. Add additional Cloud.
Pull extender to expose greeting.
If you made it this far.... pat yourself on the back! If you are totally confused, I am sorry, I am on meds. If you would like to get one of my slider cards in the mail, leave me a comment and I will have a drawing & contact you by email to get your address.
Congrats Diane O on winner the slider card!
Have a La Dee Dah Day!
Buy the Stamp Set- Moving Forward to Support the Ronald McDonald House Charity!


Awesome tutorial Laura . . . thanks so much for sharing! 'Love your creativity and blog format . . .'so easy to read!
ReplyDelete~Brenda
This is too cute!! Thanks so much for the tutorial. I agree very easy to read and precise!
ReplyDeleteThanks for sharing
Whitney
so cute and what a SUPER DUPER TUTER! NOW I can make one too! I never knew how and you just taught me. Thanks soooooooo much LL! Hugs~Donna
ReplyDeleteTerrific tutorial, Laura. Looks like it would be easy to follow, especially with all the pictures. Thanks so much. Love the card.
ReplyDeleteStep by step makes it look so easy. Thank you it all makes sense now.
ReplyDeleteThank you so much for sharing this tutorial. I can hardly wait to try and make one for my grandson.
ReplyDeleteHi Laura...Thanks so much for the tutorial. I love your card! For being on meds, you did a great job!! Sorry I didn't get a chance to meet up with you at Convention. The airline sent my luggage to Halifax! Maybe next year we can get together for breakfast again!!
ReplyDeleteGreat tutorial...thanks for taking your time to do this to share with us. As soon as I can use both hands...this will be my first project!
ReplyDeleteloverly and great tut. TFS
ReplyDeleteWow, Laura Lynn. This is a real WOW card. Love it!
ReplyDeletethis is fantastic! thanks for all the details!
ReplyDeleteCONGRATS! on winning Shelli's Challenge. My daughter saw your card and wants to make it her birthday party invitations for her 3 year old twin boys. FUN.
ReplyDeleteHow supremely adorable! I am totally going to try one myself. Thanks for the instructions, too...saves us trying to figure it out ourselves :)
ReplyDeleteSuper nice!!! THanks for the instructions. Congratulations on winning the SoShelli challenge!
ReplyDeleteYou really deserve it!
What a cute card! Congrats for your win.
ReplyDelete